Useful Tools that Helped in Building a Custom Promotion-Code CLI (built in Ruby)
Table of contents
What
This is post is going to be referring to this custom promotion-code generating CLI’s code, and about useful tools that helped in building it. All the tools mentioned are native to Ruby (no external gems were used)
The data generated is going to be stored in a JSON object, and has the following format:
"<FirstName LastName>": {
  "code": "String: Generated code",
  "activated": "Boolean"
}
You may think “Wait a minute there, that’s not a scalable solution, isn’t it?”
Well, yes, ideally, the promotion codes should be directly connected to your database. But if you want a quick solution, this should be fine
Also, keep in mind that this is not storing your main data. It’s just storing the promotion codes and checking whether they’re activated or not. It has a constant (O(1)) lookup and write time-complexity, and can hold an awful lot of data. Approximately, a JSON file can hold about 18 quintillion characters. For context: “Harry Potter and the Deathly Hallows” has about 1 million characters. So, in total, a JSON file would hold about 13 trillion copies of that book. That’s a lot!
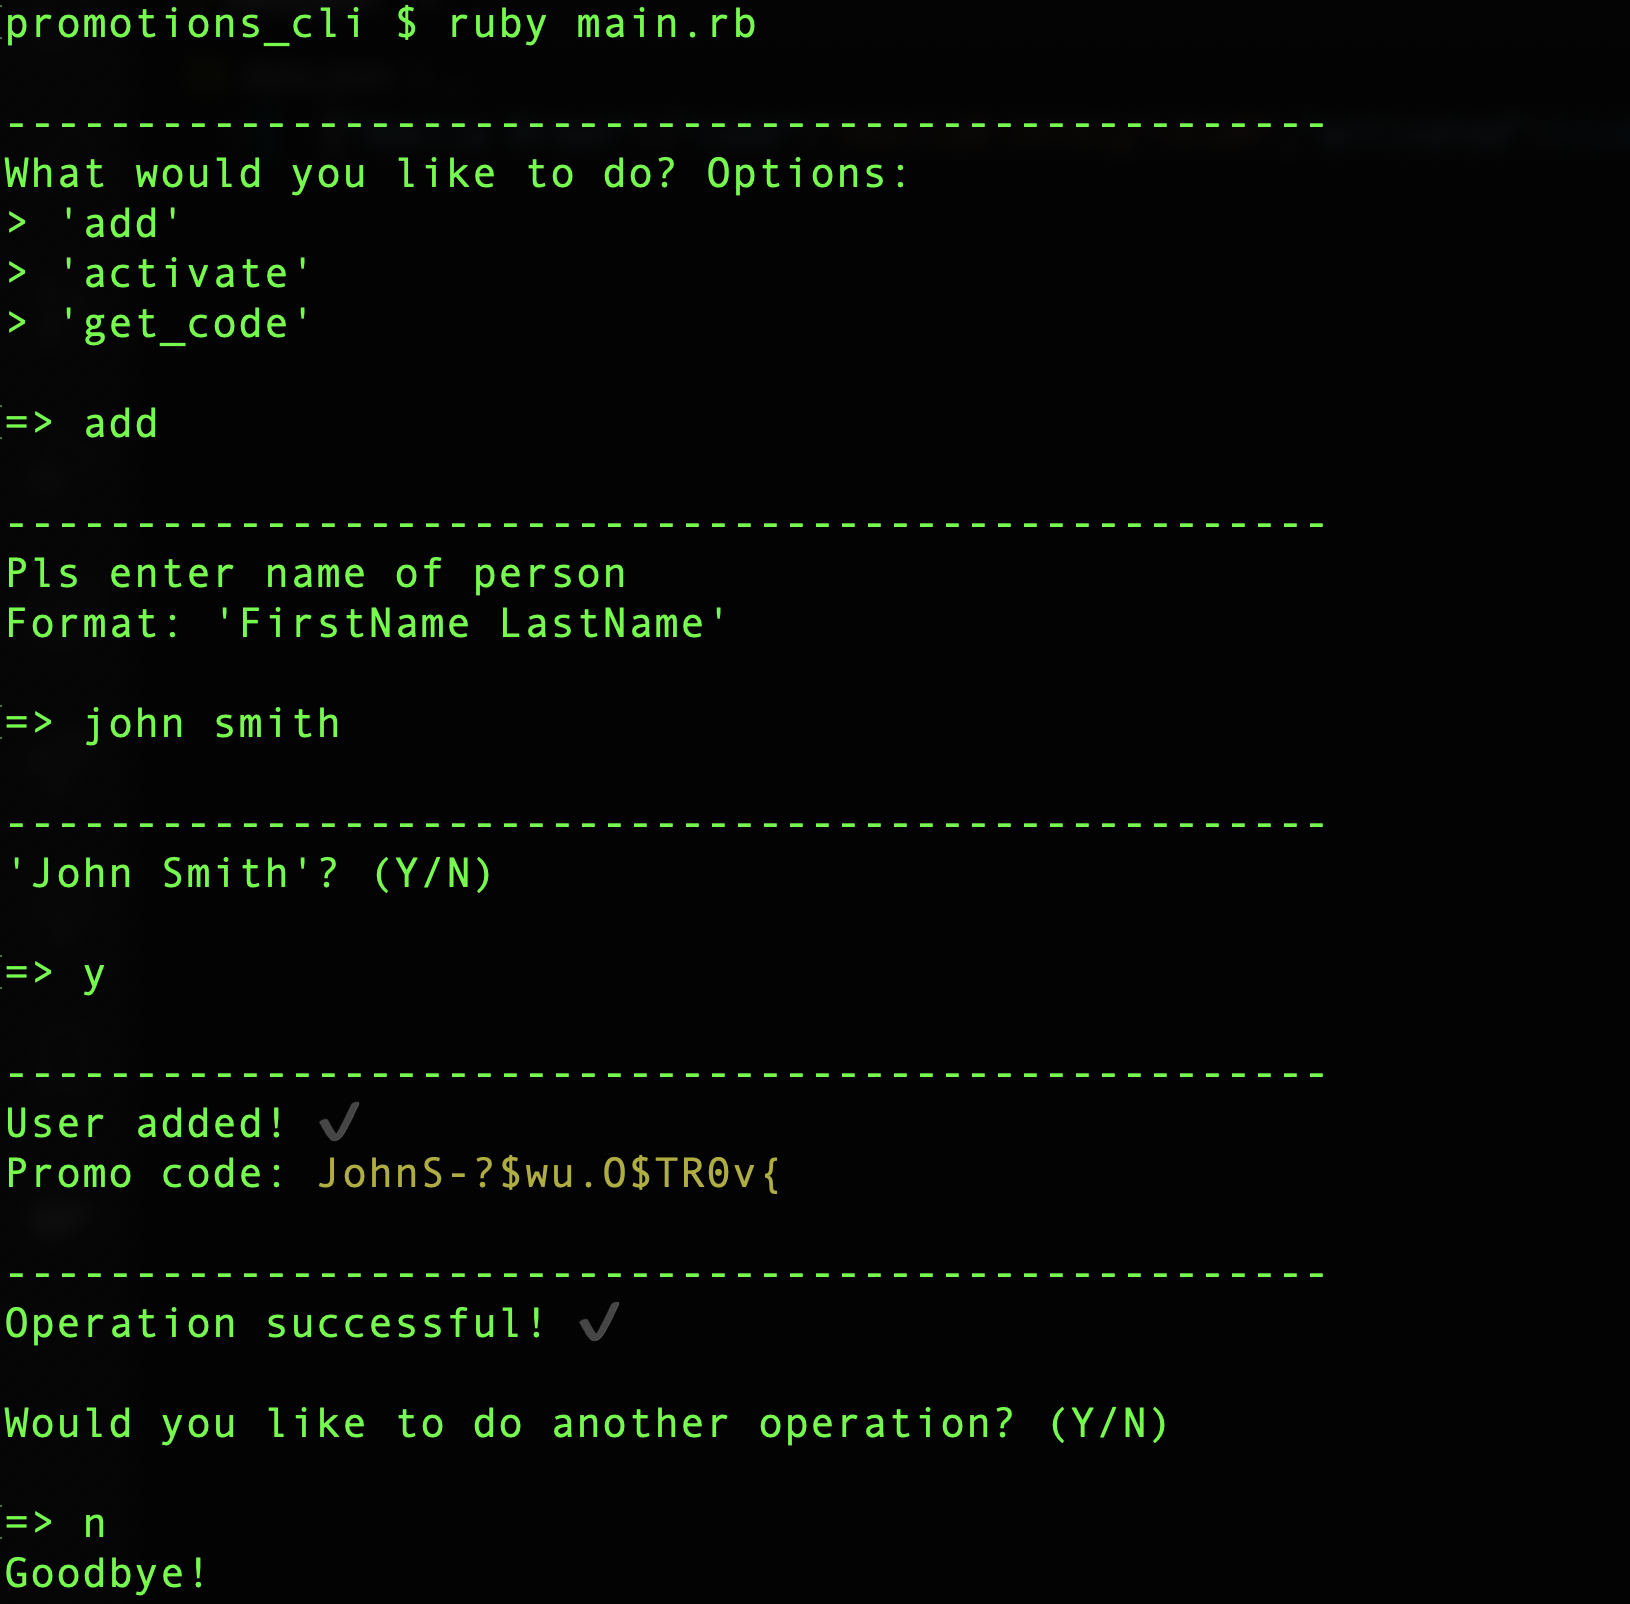
Screenshot of promotional code generator CLI
Why
“Why should I bother with creating a custom promotion-code generator?”
As you may know, promotional codes are typically used in stores, offline and online, to drive traffic. Generally speaking, general promotion codes (ones not mapped to a specific person), don’t need to be unique. In fact, you want them to be generic to drive as much traffic to your store as possible. They should be easy to guess and could be safely made up by humans
Customized promotion codes, on the other hand, though intended to also drive traffic, have another sole purpose. The main purpose of them should be to get specific people onto your platform
Understanding that these codes are made for specific people, you want them to be harder to guess. That is because we don’t want some imposter claiming our invitees' rewards
Hope that makes sense. If not, feel free to drop a comment
The Tools
1. Kernel#puts
Prints string on single line (doesn’t allow other stuff to get printed on same line)
Example:
puts 'Hello'
puts 'world'
Output:
Hello
World
2. Kernel#gets and String#chomp
gets: Takes input from shell
chomp: Takes off newline character ("\n") off from end of string. This character gets generated when user hits the enter key
Put together because they are often used together. Just having Kernel#gets will leave you with a string with "\n" at the end of it
The following example uses both to avoid that
Example:
puts 'Please say something: '

answer = gets.chomp

puts answer
Output:
$ Please say something: Hello
Hello
Note: The project referred to in this post doesn’t use gets.chomp and uses
Readline (#3) instead. That is since Readline provides autocompletion, history reference, and other useful functionalities. But gets.chomp could be useful for getting simple input in some
instances. So it’s worth the mention
3. Readline::readline(<file name>, <refer to history bool>)
Takes input from shell. Takes off newline character ("\n") automatically
Second argument takes boolean to flag whether to remember history or not.
If you set to true, it will remember previous answers from same file-run session
Example:
require 'readline'

answer = Readline.readline('Please say something: ', true)

puts answer

answer = Readline.readline('Please say something: ', true)

puts answer
Output:
$ Please say something: Hello
Hello
$ Please say something: [*click up-arrow*]
$ Please say something: Hello
Hello
4. Readline::completion_proc = <proc>
Adds autocompletion functionality based on given proc
Example:
require 'readline'

LIST = ['action', 'bear', 'computer']

comp = proc { |s| LIST.grep(/^#{Regexp.escape(s)}/) }

Readline.completion_proc = comp
Readline.readline('', true)
Output:
$ co[*click on tab*]
$ computer
5. String#downcase
Lower-cases a string
Useful for keeping data format consistent
Example:
puts 'HELLO WORLD'.downcase
Output:
hello world
6.String#strip
Takes off whitespace from beginning and end of string
Useful for keeping data format consistent
Example:
puts ' hi there '.strip
Output:
hi there
(I know it doesn’t show up there, but there should be no white spaces at the ends of the string)
7. IO.read(<file name>)
Reads file content and returns it as string
Example:
file_content = IO.read('data.json')

puts file_content
Output:
"{\"some key\": \"some value\"}"
8. JSON#parse(<json string>)
Converts JSON string to JSON object
Example:
require 'json'

puts JSON.parse("{\"some key\": \"some value\"}")
Output:
{"some key": "some value"}
9. JSON#dump(<json string>)
Converts JSON object to JSON string
Example:
require 'json'

puts JSON.dump({"some key": "some value"})
Output:
"{\"some key\": \"some value\"}"
10. File::Open(<file name>, ‘w’) {|file| <changes to file>}
Opens and writes data to file (writing automatically gets it saved)
Example:
require 'json'

file_name = 'data.json'
new_data = {"some new key": "some new value"}

File.open(file_name,'w'){ |file| JSON.dump(new_data, file) }
json = JSON.parse(IO.read(file_name))

puts json
Output:
{"some key": "some value", "some new key": "some new value"}
Bonus:
11. "\e[#{<color number>}m#{<some string>}\e[0m"
Changes color of string in shell based on ANSI escape code FG Code number
Example:
str = 'Hello world'
color_num = 36 # cyan

puts "\e[#{color_num}m#{str}\e[0m"
Output:
Hello world
Show me the code
Here’s the link to the repo
If you plan to create a similar tool, I suggest scanning around the repo (same link). It’s basically 4 files of Ruby code, and none of them exceed 100 lines. Hope that helps
Happy coding!
Like what you're seeing? Subscribe below to recieve notifications of new posts ⬇️
Promise not to send more than 1 email per month (not counting subscription confirmation email) 👨💻
Updated: 27 November, 2020
Created: 24 November, 2020